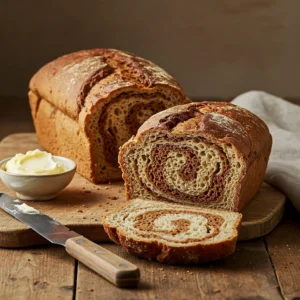
There’s something truly special about marble rye bread—the mesmerizing swirl, the perfect balance of flavors, and that soft yet chewy texture that makes every bite unforgettable. Whether you’ve enjoyed it as a classic sandwich bread or toasted with butter, this homemade marble rye will take your love for bread to the next level.
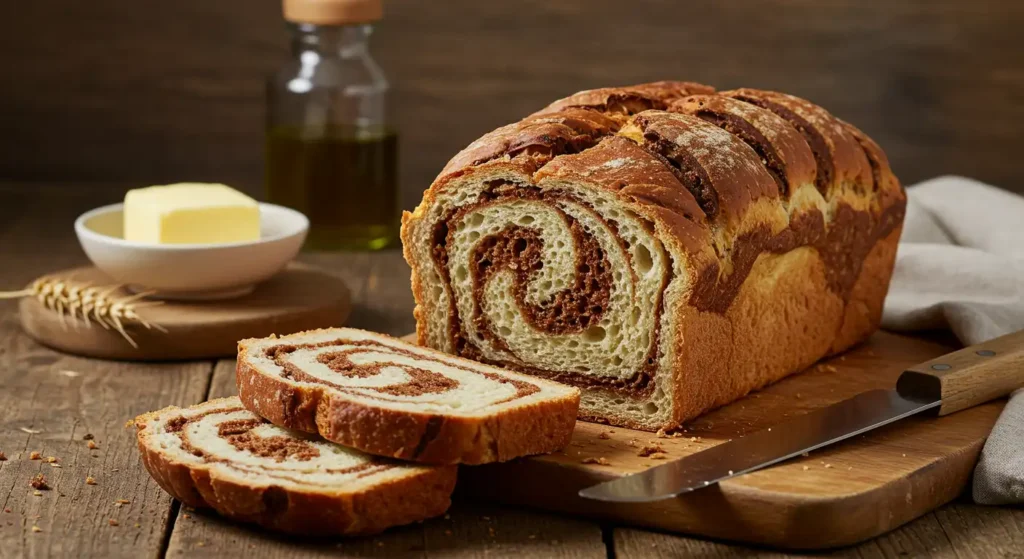
This recipe brings together light and dark rye dough, creating a beautiful marbled effect that’s easier to achieve than you might think. With a subtle hint of caraway seeds and a perfectly tender crumb, this bread is just as delicious on its own as it is piled high with your favorite sandwich fillings.
If you’ve ever wanted to bake your own marble rye bread from scratch, this step-by-step guide will walk you through the process—from mixing and proofing to rolling the signature swirl. Whether you’re a seasoned baker or trying rye bread for the first time, you’ll love the satisfying results of this soft, swirled, and bakery-worthy loaf!
Table of Contents
Key Benefits
Incredible Flavor & Texture – A perfect balance of light and dark rye dough with a hint of caraway seeds, giving it a classic, slightly tangy taste.
No Artificial Ingredients – Unlike store-bought loaves, this homemade rye bread is free from preservatives, giving you fresh, wholesome slices.
Versatile & Satisfying – Enjoy it as a sandwich bread, toast it with butter, or pair it with soups and stews.
Impressive Swirl Design – The marbled effect not only looks gorgeous but also creates a beautiful layering of flavors in every bite.
Beginner-Friendly Recipe – With clear instructions, simple ingredients, and helpful tips, even first-time bread bakers can achieve bakery-level results.
If you’re looking for a classic deli-style rye bread that’s soft, chewy, and packed with rich flavor, this marble rye bread recipe is a mus
Ingredients for Marble Rye Bread
Gathering the right ingredients is key to achieving the perfect balance of flavor, texture, and structure in your homemade marble rye bread. Below, you’ll find everything you need to create both the light rye dough and dark rye dough, along with essential components that bring this loaf to life.
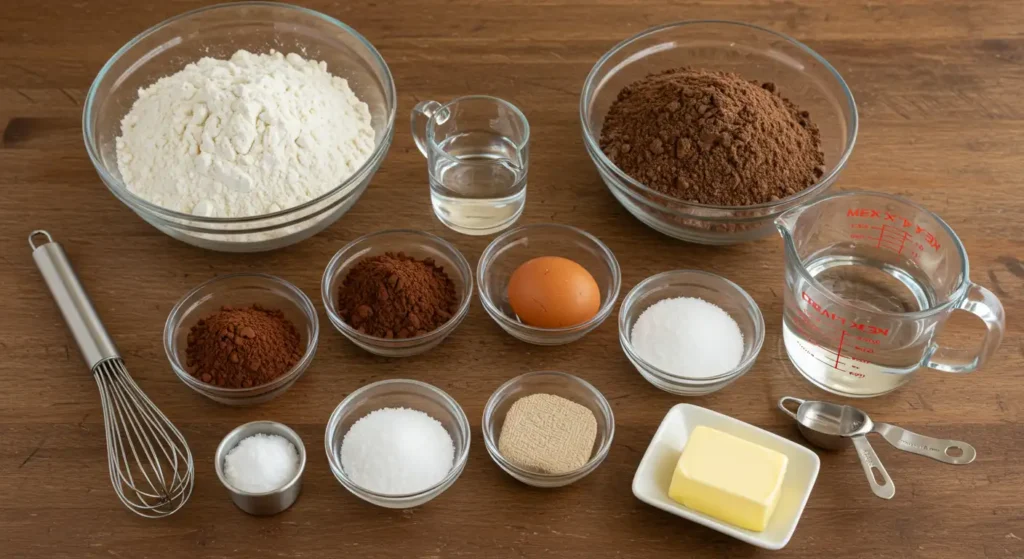
For the Dough:
Bread Flour (3 cups) – Provides structure and chewiness to the bread.
Rye Flour (2 cups) – Gives the bread its signature earthy flavor. You can use light, medium, or dark rye flour depending on your preference.
Warm Water (1 ½ cups, around 110°F) – Activates the yeast and hydrates the dough.
Active Dry Yeast (2 ¼ teaspoons) – Helps the bread rise for a soft, airy texture.
Sugar (1 tablespoon) – Feeds the yeast and adds a slight sweetness to balance the rye’s bold flavor.
Salt (2 teaspoons) – Enhances the overall taste and strengthens the dough’s structure.
Caraway Seeds (1 tablespoon, optional) – Adds a classic deli-style rye flavor.
For the Dark Rye Dough:
Unsweetened Cocoa Powder (1 tablespoon) – Deepens the color without altering the flavor.
Molasses (1 tablespoon) – Adds a slight sweetness and richness to the dark rye layer.
For the Egg Wash:
Egg (1, beaten) – Gives the crust a beautiful golden-brown shine.
Ingredient Notes & Substitutions:
- Bread Flour Alternative – If you prefer a slightly denser texture, you can use all-purpose flour, but bread flour yields a better structure.
- Rye Flour Variation – Light rye will produce a milder taste, while dark rye will give a stronger, more pronounced flavor.
- Molasses Substitute – Honey or maple syrup can be used if you don’t have molasses on hand.
With these simple yet essential ingredients, you’re all set to start making your soft, swirled marble rye bread! Next, we’ll guide you through the step-by-step process of mixing, kneading, and shaping the dough.
How to Make Marble Rye Bread
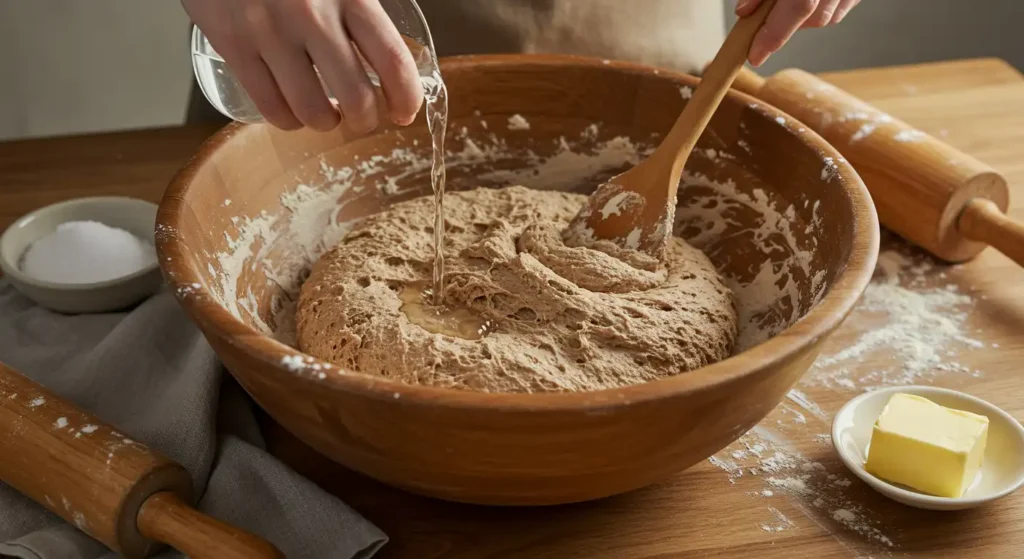
Now that we have our ingredients ready, let’s dive into the process of making this soft and beautifully swirled marble rye bread. This step covers mixing and kneading the dough—essential techniques to create the perfect texture.
Step 1: Activate the Yeast
- In a small bowl, combine warm water (110°F), sugar, and active dry yeast.
- Stir gently and let it sit for 5–10 minutes until it turns foamy. This ensures the yeast is active and ready to help the bread rise.
Tip: If your yeast doesn’t foam, it may be expired, or the water temperature might be too hot or too cold. Start again with fresh yeast.
Step 2: Prepare the Doughs
We’ll be making two doughs—one light and one dark—to achieve the classic marble rye swirl.
For the Light Rye Dough:
- In a large mixing bowl, combine half of the bread flour, half of the rye flour, salt, and caraway seeds (if using).
- Add half of the activated yeast mixture and stir until a shaggy dough forms.
For the Dark Rye Dough:
- In a separate bowl, mix the remaining bread flour, rye flour, salt, and caraway seeds.
- Stir in cocoa powder and molasses for a rich color and slight sweetness.
- Pour in the rest of the yeast mixture and mix until combined.
Step 3: Knead the Doughs
- Lightly flour a clean surface and knead each dough separately for 8–10 minutes until smooth and elastic.
- If the dough is too sticky, add flour gradually, one tablespoon at a time.
- To check if it’s ready, use the windowpane test: stretch a small piece of dough between your fingers—if it becomes thin and translucent without tearing, it’s properly kneaded.
Tip: Using a stand mixer with a dough hook can save time! Knead on medium speed for about 5–7 minutes until the dough pulls away from the sides of the bowl.
Step 4: Let the Dough Rise
- Lightly grease two separate bowls and place each dough inside, covering with a damp towel.
- Let them rise in a warm, draft-free area for about 1–1.5 hours, or until doubled in size.
Once the doughs have risen, it’s time for the fun part—shaping the swirl!
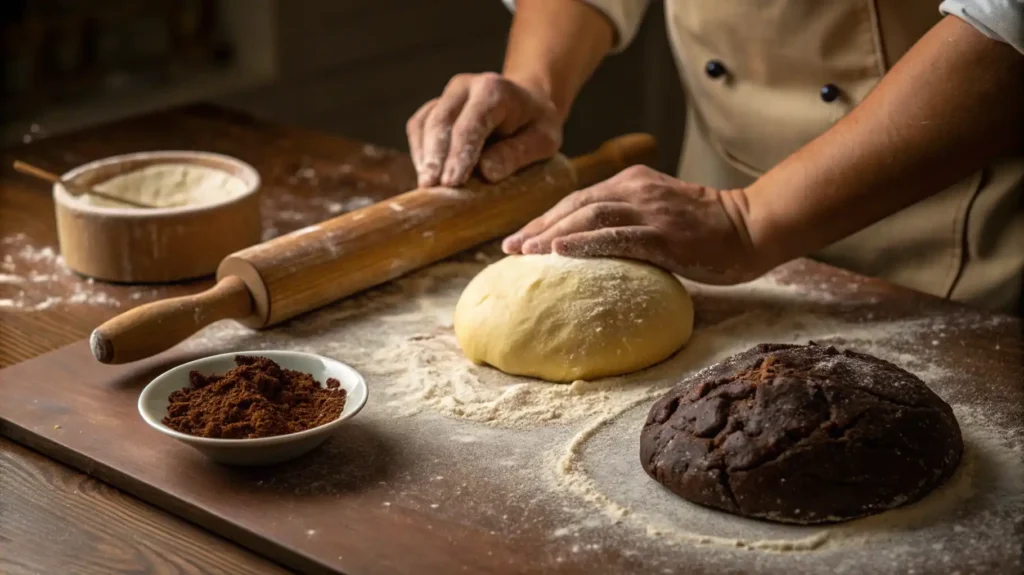
Step 5: Shape the Swirl
- Roll out both doughs into equal-sized rectangles (about 9×12 inches).
- Place the dark dough on top of the light dough and press gently to stick them together.
- Roll tightly into a log, seal the edges.
- Put the loaf in the greased pan, seam-side down.
- Cover and let it rise for 45–60 minutes, until puffy.
Now, it’s ready to bake into a beautifully swirled marble rye bread!
Pro Tips and Variations
Creating the perfect marble rye bread at home can be a rewarding experience. Here are a few pro tips and variations to help you achieve the soft, swirled texture and rich flavor you’re looking for:
Pro Tips for Success
- Use fresh yeast: For the best rise and texture, ensure your yeast is fresh and active. If using dry yeast, proof it in warm water before mixing with other ingredients.
- Don’t rush the rise: Patience is key. Allow the dough to rise fully during both stages—this ensures a fluffy, airy bread with a soft crumb.
- Maintain an even dough thickness: When rolling out your dough, make sure both the light and dark dough layers are the same thickness. This creates a more uniform swirl pattern.
- Grease the pan well: To avoid sticking, generously grease your loaf pan with butter or non-stick spray. Make removing the baked loaf a breeze by first lining your pan with parchment paper.
Variations to Try
- Add caraway seeds: A traditional ingredient in rye bread, caraway seeds bring an earthy flavor to your marble rye. Sprinkle them on top of the loaf before baking for added crunch and flavor.
- Swirl in some rye flour: If you prefer a more pronounced rye flavor, increase the proportion of rye flour in the light dough or use a rye flour starter for the base.
- Make it a sandwich loaf: If you love rye bread for sandwiches, simply shape the dough into a more rectangular loaf before baking. The swirls will still be visible, but the shape will be ideal for slicing.
By following these tips and exploring variations, you can make the perfect marble rye bread every time, tailored to your tastes. Enjoy experimenting with your own spin on this classic recipe!
Serving Suggestions
Once you’ve perfected your marble rye bread, you’ll want to enjoy it in as many delicious ways as possible! Here are a few serving suggestions to make the most out of your homemade masterpiece:
1. Classic Rye Toast
There’s nothing like a warm, toasted slice of marble rye bread with a smear of butter. Toast the slices until golden brown for a crunchy texture, and top with butter or your favorite jam. It’s the perfect simple snack or side to a hearty breakfast.
2. Sandwiches and Reubens
Marble rye bread is the classic choice for a Reuben sandwich, pairing perfectly with corned beef, Swiss cheese, and sauerkraut. Try making a Reuben-inspired sandwich with your homemade rye for a comforting, savory meal.
- Pro tip: For a quick lunch, top it with deli meats, cheese, and a drizzle of mustard or mayo for an elevated sandwich experience.
3. With Soups and Stews
The slightly tangy flavor of rye bread complements rich, savory soups and stews beautifully. Serve your fresh loaf alongside a bowl of chicken soup, beef stew, or a vegetable soup to dip in. The chewy texture of the bread soaks up flavors perfectly.
4. Make Bread Crumbs
Don’t let any leftover slices go to waste! Turn your marble rye bread into bread crumbs by drying out the slices and pulsing them in a food processor. These make an excellent coating for chicken, fish, or even a crispy topping for casseroles.
5. Fancy Appetizer Bites
For an elegant touch, slice the bread into small pieces and toast them lightly. Top each slice with a spread like cream cheese, smoked salmon, and a sprinkle of herbs or olives for a sophisticated appetizer at your next gathering.
6. As a Side for Cheese Platters
Pair your marble rye with a variety of cheeses—sharp cheddar, creamy goat cheese, or tangy blue cheese. The slightly sour, hearty flavor of the rye enhances the richness of the cheeses, making it a perfect addition to any cheese platter or charcuterie board.
With these ideas, you can enjoy your marble rye bread in a variety of ways that suit every occasion—whether it’s for a cozy meal or a celebratory feast.
Conclusion
This homemade marble rye bread is a delightful blend of soft, flavorful bread with a stunning swirl. Perfect for sandwiches, toast, or as a side, it’s an easy recipe that brings big rewards. Enjoy the satisfaction of baking your own delicious bread and share it with loved ones!
Marble Rye Bread
Ingredients
For the Dough:
- Bread Flour 3 cups – Provides structure and chewiness to the bread.
- Rye Flour 2 cups – Gives the bread its signature earthy flavor. You can use light, medium, or dark rye flour depending on your preference.
- Warm Water 1 ½ cups, around 110°F – Activates the yeast and hydrates the dough.
- Active Dry Yeast 2 ¼ teaspoons – Helps the bread rise for a soft, airy texture.
- Sugar 1 tablespoon – Feeds the yeast and adds a slight sweetness to balance the rye’s bold flavor.
- Salt 2 teaspoons – Enhances the overall taste and strengthens the dough’s structure.
- Caraway Seeds 1 tablespoon, optional – Adds a classic deli-style rye flavor.
For the Dark Rye Dough:
- Unsweetened Cocoa Powder 1 tablespoon – Deepens the color without altering the flavor.
- Molasses 1 tablespoon – Adds a slight sweetness and richness to the dark rye layer.
For the Egg Wash:
- Egg 1, beaten – Gives the crust a beautiful golden-brown shine.
Ingredient Notes & Substitutions:
- Bread Flour Alternative – If you prefer a slightly denser texture you can use all-purpose flour, but bread flour yields a better structure.
- Rye Flour Variation – Light rye will produce a milder taste while dark rye will give a stronger, more pronounced flavor.
- Molasses Substitute – Honey or maple syrup can be used if you don’t have molasses on hand.
Instructions
Step 1: Activate the Yeast
- In a small bowl, combine warm water (110°F), sugar, and active dry yeast.
- Stir gently and let it sit for 5–10 minutes until it turns foamy. This ensures the yeast is active and ready to help the bread rise.
- Tip: If your yeast doesn’t foam, it may be expired, or the water temperature might be too hot or too cold. Start again with fresh yeast.
Step 2: Prepare the Doughs
- We’ll be making two doughs—one light and one dark—to achieve the classic marble rye swirl.
- For the Light Rye Dough:
- In a large mixing bowl, combine half of the bread flour, half of the rye flour, salt, and caraway seeds (if using).
- Add half of the activated yeast mixture and stir until a shaggy dough forms.
- For the Dark Rye Dough:
- In a separate bowl, mix the remaining bread flour, rye flour, salt, and caraway seeds.
- Stir in cocoa powder and molasses for a rich color and slight sweetness.
- Pour in the rest of the yeast mixture and mix until combined.
Step 3: Knead the Doughs
- Lightly flour a clean surface and knead each dough separately for 8–10 minutes until smooth and elastic.
- If the dough is too sticky, add flour gradually, one tablespoon at a time.
- To check if it’s ready, use the windowpane test: stretch a small piece of dough between your fingers—if it becomes thin and translucent without tearing, it’s properly kneaded.
- Tip: Using a stand mixer with a dough hook can save time! Knead on medium speed for about 5–7 minutes until the dough pulls away from the sides of the bowl.
Step 4: Let the Dough Rise
- Lightly grease two separate bowls and place each dough inside, covering with a damp towel.
- Let them rise in a warm, draft-free area for about 1–1.5 hours, or until doubled in size.
- Once the doughs have risen, it’s time for the fun part—shaping the swirl!
Step 5: Shape the Swirl
- Roll out both doughs into equal-sized rectangles (about 9×12 inches).
- Place the dark dough on top of the light dough and press gently to stick them together.
- Roll tightly into a log, seal the edges.
- Put the loaf in the greased pan, seam-side down.
- Cover and let it rise for 45–60 minutes, until puffy.
Notes
Nutrition Information (Per Serving):
- Calories: 160 kcal
- Fat: 1.5g
- Protein: 5g
- Carbs: 28g
- Fiber: 3g
- Sugar: 3g
- Sodium: 200mg
- Cholesterol: 0mg
FAQs
Got some questions? Let’s clear them up! Below are a few frequently asked questions to help you get the most out of your marble rye bread baking experience.
1. Can I make this bread without the rye flour?
While rye flour is essential for that classic marble rye flavor, you can substitute it with more all-purpose flour if you’re in a pinch. However, the texture and taste will be slightly different.
2. How do I store the marble rye bread?
Once baked, let the bread cool completely before storing. Keep it in an airtight container or bread bag at room temperature for up to 3-4 days. For longer storage, slice the bread and freeze it, so it’s ready whenever you need it.
3. Can I double the recipe?
Absolutely! Doubling the recipe is a great idea if you’re feeding a crowd or want extra bread for sandwiches. Just make sure you have enough room in your oven for two loaves to bake evenly.
4. What can I use this bread for besides sandwiches?
Marble rye bread is versatile! It’s perfect for toast, paired with soups, or used for a delicious bread pudding. You can even slice it for croutons to top your salads.
5. Why does my bread have a heavy or dense texture?
If your marble rye bread turns out too dense, it could be due to over-kneading or not allowing the dough to rise enough. Be sure to follow the rise times and knead gently.
6. Can I add other flavorings to the bread?
Absolutely! Try adding a teaspoon of caraway seeds or a bit of garlic powder to give the bread extra flavor. Customize the dough to your taste.
Now you’re all set to make your own delicious marble rye bread! Whether you’re a beginner or a pro, enjoy the process and the delightful results. Happy baking!