Sometimes you just want something sweet without turning on the oven. These Mini Biscoff Cheesecakes have become one of those recipes I keep coming back to, especially around the holidays or whenever I need a quick but impressive dessert. The base is made with crushed Lotus Biscoff cookies, the filling is rich and creamy, and the whole thing comes together with zero baking. If you love easy desserts cheesecake style, this one is genuinely hard to beat.
They are individually portioned, which makes them perfect for sharing, holiday dessert tables, or just having a few stashed in the fridge for later. No springform pan, no water bath, no stress.
What You Need to Make Mini Biscoff Cheesecakes
The ingredient list is short, which is part of why this recipe works so well. Nothing fancy, just good-quality basics that come together fast.
- 200g Lotus Biscoff cookies (about 26 cookies), finely crushed
- 60g unsalted butter, melted
- 340g full-fat cream cheese, softened to room temperature
- 120ml heavy whipping cream, cold
- 80g powdered sugar, sifted
- 100g Biscoff spread (smooth), plus extra for drizzling
- 1 tsp pure vanilla extract
- 12 whole Biscoff cookies, for topping (optional)
How to Make Mini Biscoff Cheesecakes Step by Step
Line a 12-cup muffin tin with paper liners. This makes removing them later much easier and keeps the edges clean.
- Crush the Biscoff cookies into fine crumbs using a food processor or a zip-lock bag and rolling pin.
- Mix the crumbs with melted butter until the texture looks like wet sand.
- Press about 1.5 tablespoons of the mixture firmly into the bottom of each liner. Use the back of a spoon or a small glass to compact it well.
- Refrigerate the crust while you prepare the filling.
- Beat the cream cheese with an electric mixer until completely smooth, about 2 minutes.
- Add the powdered sugar, vanilla extract, and Biscoff spread. Mix again until fully combined and creamy.
- In a separate bowl, whip the cold heavy cream to stiff peaks.
- Fold the whipped cream into the cream cheese mixture gently, in two additions, to keep the filling light.
- Spoon or pipe the filling over each crust, filling the liners close to the top.
- Smooth the tops, then refrigerate for at least 4 hours, or overnight for best results.
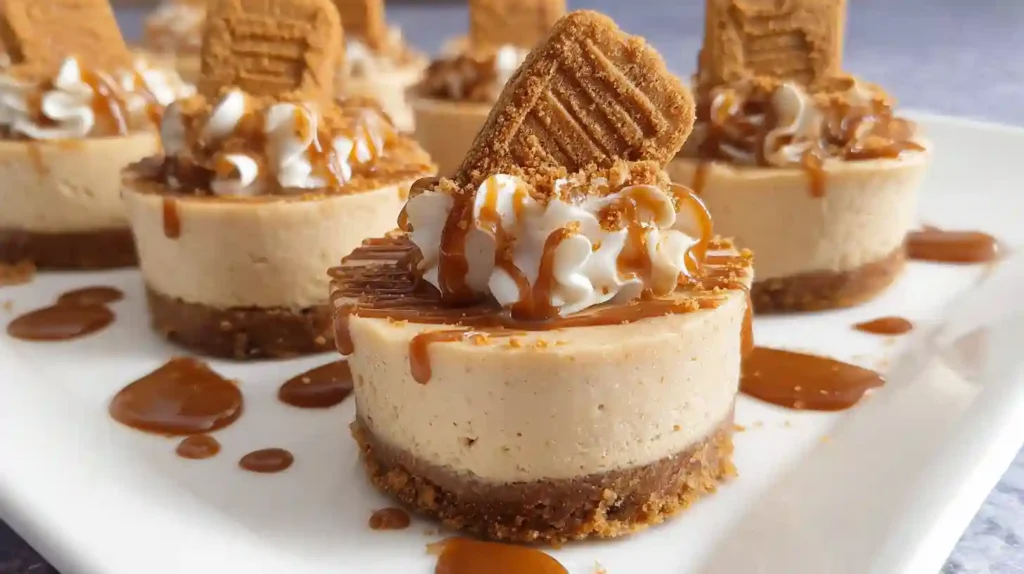
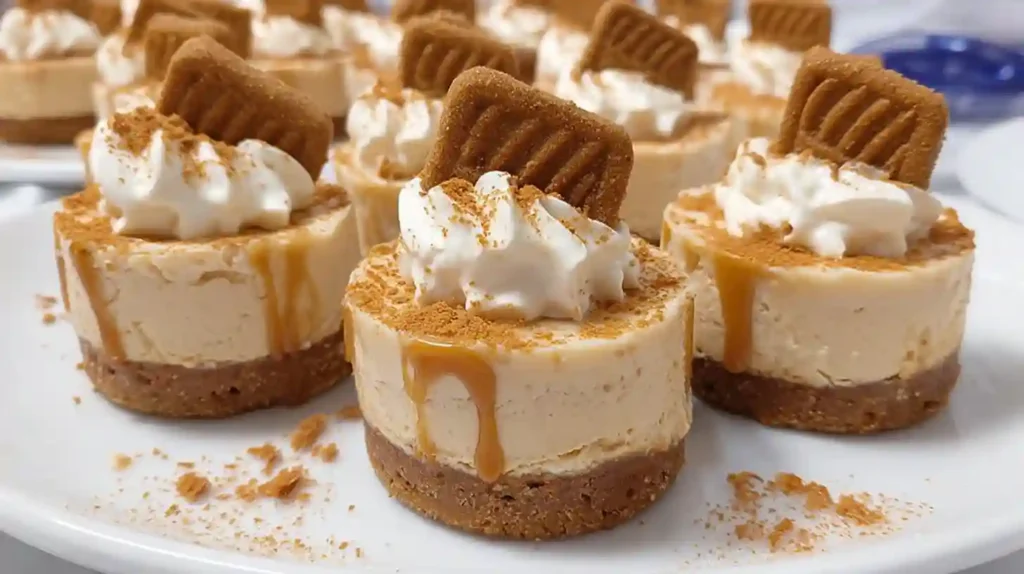
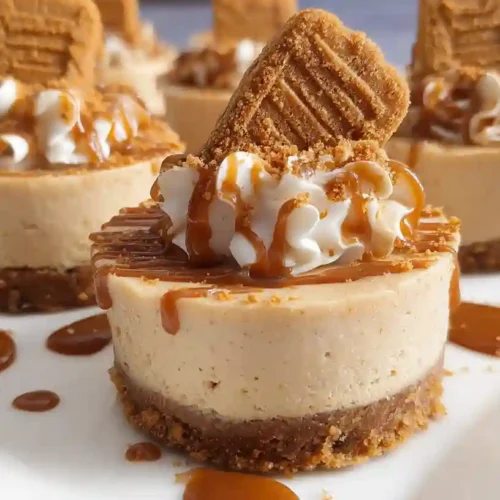
- Before serving, drizzle with warmed Biscoff spread and top each one with a whole Biscoff cookie.
Tips That Actually Make a Difference
Room temperature cream cheese is non-negotiable here. Cold cream cheese will leave lumps in the filling no matter how long you mix it. Pull it out of the fridge at least 45 minutes before you start.
Cold heavy cream whips up much faster and holds its shape better. Keep it in the fridge right up until you need it. Also, do not skip the folding step, stirring aggressively will deflate the whipped cream and make the filling dense instead of airy.
If you want cleaner edges on your cheesecake bites, use a piping bag to fill the liners instead of a spoon.
Ingredient Swaps Worth Knowing
No Biscoff spread? Peanut butter or Nutella both work as substitutes in the filling, though the flavor will shift noticeably. For the crust, graham crackers or digestive biscuits are a fine swap if you run out of Biscoff cookies.
Dairy-free? Use vegan cream cheese and coconut cream instead of heavy cream. The texture is slightly softer but still very good. Biscoff spread itself is already vegan, so no changes needed there.
Variations to Try
These are great as cheesecake bite recipes for seasonal dessert ideas. Around Thanksgiving sweets season, a pinch of cinnamon in the filling fits perfectly. For holiday dessert recipes Christmas gatherings, a swirl of dark chocolate ganache on top adds a festive touch without much extra work.
You can also make these as mini tartlet recipes by pressing the crust into silicone tart molds instead of a muffin tin. They pop out cleanly and look a bit more polished if you are serving them on a dessert board. For New Years easy desserts, a dusting of gold sugar on top is a small but effective detail.
Storage and Serving
Store the cheesecakes in an airtight container in the fridge for up to 5 days. They actually taste better on day two once everything has set and the flavors have had time to settle. These also freeze well – place them on a baking sheet to freeze solid first, then transfer to a freezer bag. Thaw overnight in the fridge before serving.
Serve them cold, straight from the fridge. They are simple finger food desserts that need no plates or utensils, which is part of their charm at any casual gathering or holiday spread.
FAQ
Can I make these mini Biscoff cheesecakes ahead of time?
Yes, they are actually better when made a day ahead. The filling sets more firmly overnight and the crust stays intact without getting soggy.
Why is my cheesecake filling too soft?
The most common reason is under-whipped cream or warm cream cheese. Make sure your heavy cream is cold and whipped to stiff peaks before folding. If the filling still seems loose, refrigerate for an extra hour.
Do these need to be baked?
No, this is a non bake dessert recipe. The filling sets entirely from refrigeration, no oven needed at any point.
Can I use low-fat cream cheese?
It is not recommended. Low-fat cream cheese has more moisture and the filling will not set firmly enough. Full-fat gives the best texture.
How do I get clean layers when I cut them?
Since these are individually sized in muffin liners, you do not need to cut them at all. Just peel back the paper and serve whole, which keeps the layers perfectly intact.
Can I add gelatin to help the filling set?
You can, but it is not necessary if you use full-fat cream cheese and properly whipped cream. Gelatin can make the texture more dense and rubbery if over-used, so skip it unless you are working in a very warm environment.
Mini Biscoff Cheesecakes
Equipment
- 12-cup muffin tin
- Electric hand mixer
- Food processor
- Mixing bowls
Ingredients
- 200 g Lotus Biscoff cookies finely crushed, about 26 cookies
- 60 g unsalted butter melted
- 340 g full-fat cream cheese softened to room temperature
- 120 ml heavy whipping cream cold
- 80 g powdered sugar sifted
- 100 g Biscoff spread smooth, plus extra for drizzling
- 1 tsp pure vanilla extract
- 12 whole Biscoff cookies for topping, optional
Instructions
- Prepare a 12-cup muffin tin with paper liners and set aside.
- Crush the Biscoff cookies into fine crumbs using a food processor, then mix with melted butter until it resembles wet sand.
- Press about 1.5 tablespoons of crust mixture firmly into the bottom of each liner. Refrigerate while you make the filling.
- Beat the softened cream cheese with an electric mixer until completely smooth, about 2 minutes.
- Add the powdered sugar, vanilla extract, and Biscoff spread. Mix until fully combined and creamy.
- Whip the cold heavy cream in a separate bowl to stiff peaks.
- Fold the whipped cream gently into the cream cheese mixture in two additions. Do not overmix.
- Spoon or pipe the filling over each crust, smoothing the tops.
- Refrigerate for at least 4 hours, or overnight for best results.
- Top each cheesecake with a drizzle of warmed Biscoff spread and a whole Biscoff cookie before serving.
Notes
- Cream cheese must be fully softened to avoid lumps in the filling.
- Keep heavy cream cold until the moment you whip it.
- These freeze well for up to 2 months – freeze solid on a tray first, then bag them.
- Total time includes 4 hours of chilling time.